Part III: Modifications and Operating Tips for the Schmidt Camera

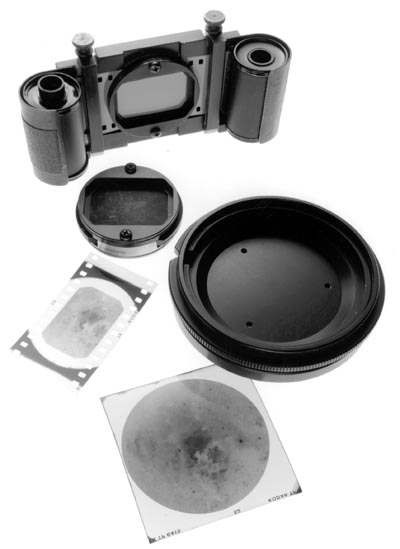
Homemade Roll Film Holder
The use of roll film in the Schmidt camera is perhaps the single greatest
convenience that can be added to the camera beyond the use of an autoguider.
A homemade roll film holder can be made from easily obtained hardware items
and an hour's worth of do-it-yourself work.
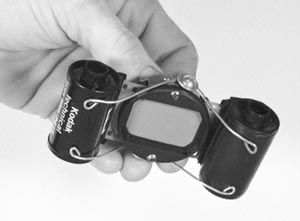
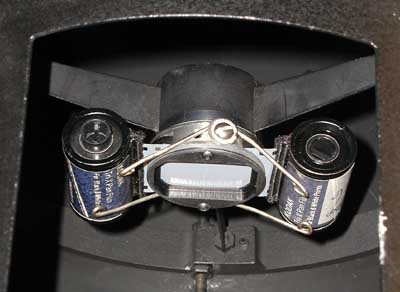
The mechanics of a homemade roll film holder are simple. The film leader is
passed through the Schmidt's film holder just as when loading single shot
film chips. Instead of cutting the film, the supply cassette is left hanging
from the film holder. The leader extending through the film holder is then
spooled into a reusable 35 mm cassette. Now there are two cassettes hanging
from the film holder. The problem is to keep the cassettes from drooping
into the light cone reflecting from the Schmidt's mirror back onto the film
holder. The solution is to fabricate a stiff wire cradle to support the
cassettes.
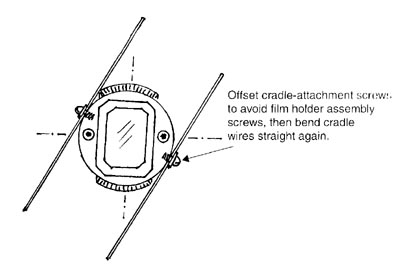 To fabricate the cradle, remove the pressure plate and its locking screw to
avoid damaging them. Next, drill two holes into the side of the film holder
using a #29 drill bit. Tap these with a #8x32 machine screw tap and
carefully de-burr the inside of the film channel. Next, using two
#8x32x1/4-inch oval head machine screws and flat washers, secure six inches
of stiff wire to each side of the film holder. Two straightened thick paper
clips will work quite nicely. With needle nose pliers, fashion the wire to
form the necessary cradle and loop the ends of the wire so they have no
sharp ends. The cradle should hold the cassettes level with the film plane.
To fabricate the cradle, remove the pressure plate and its locking screw to
avoid damaging them. Next, drill two holes into the side of the film holder
using a #29 drill bit. Tap these with a #8x32 machine screw tap and
carefully de-burr the inside of the film channel. Next, using two
#8x32x1/4-inch oval head machine screws and flat washers, secure six inches
of stiff wire to each side of the film holder. Two straightened thick paper
clips will work quite nicely. With needle nose pliers, fashion the wire to
form the necessary cradle and loop the ends of the wire so they have no
sharp ends. The cradle should hold the cassettes level with the film plane.
 The wire used for the cradle needs to be at least 3/64-inch thick because it
also acts as a spacer between the film holder and flat washers holding the
wire. This 3/64-inch space is needed so the film holder's dust cover or
filter holder will still snap into place.
The wire used for the cradle needs to be at least 3/64-inch thick because it
also acts as a spacer between the film holder and flat washers holding the
wire. This 3/64-inch space is needed so the film holder's dust cover or
filter holder will still snap into place.
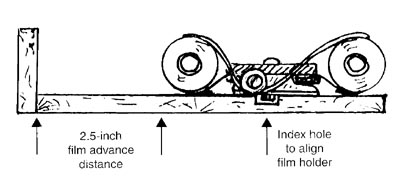
 A simple wooden jig will measure the proper film advance between exposures.
This device is used in photo changing bag because the film is open during
the procedure. The jig is an L-shaped fixture with an indexing hole drilled
into its base. The film holder's pressure plate locking screw fits into this
hole and the supply cassette is drawn out 2.5 inches until it bottoms
against the vertical leg of the L-shaped jig. This distance provides enough
film to prevent overlapped exposures and damage to the previous exposure by
the pressure plate clamping against the film holder frame.
A simple wooden jig will measure the proper film advance between exposures.
This device is used in photo changing bag because the film is open during
the procedure. The jig is an L-shaped fixture with an indexing hole drilled
into its base. The film holder's pressure plate locking screw fits into this
hole and the supply cassette is drawn out 2.5 inches until it bottoms
against the vertical leg of the L-shaped jig. This distance provides enough
film to prevent overlapped exposures and damage to the previous exposure by
the pressure plate clamping against the film holder frame.
 Once the supply film is pulled out 2.5 inches, the film holder dust cover is
removed, the pressure plate is loosened, the fresh film is drawn through,
the pressure plate is locked again and the exposed film wound into the
take-up cassette. At this point, make sure the felt lip of the supply
cassette isn't caught between the film holder frame and pressure plate. The
dust cover is then snapped into place and the film holder is ready for
reinstallation in the camera.
To tell which cassette is the supply or take-up while in the changing bag,
one of them should be marked with tape.
In an 8-inch Schmidt camera, the two cassettes on either side of the film
holder block about 10 percent of the incoming light. This means a 30-minute
exposure will have to be extended to approximately 33 minutes to achieve a
similar exposure.
Once the supply film is pulled out 2.5 inches, the film holder dust cover is
removed, the pressure plate is loosened, the fresh film is drawn through,
the pressure plate is locked again and the exposed film wound into the
take-up cassette. At this point, make sure the felt lip of the supply
cassette isn't caught between the film holder frame and pressure plate. The
dust cover is then snapped into place and the film holder is ready for
reinstallation in the camera.
To tell which cassette is the supply or take-up while in the changing bag,
one of them should be marked with tape.
In an 8-inch Schmidt camera, the two cassettes on either side of the film
holder block about 10 percent of the incoming light. This means a 30-minute
exposure will have to be extended to approximately 33 minutes to achieve a
similar exposure.
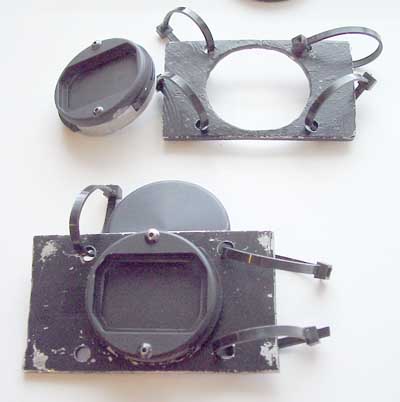 Keith Shank used an alternative approach. He made a roll film holder out of
1/16-inch aluminum plate. He drilled a matching hole in the plate that
allows a simple compression fit to the Schmidt film holder. The film spools
are held to the plate with plastic tie wraps. The aluminum plate is painted
black to prevent reflections inside the camera. To wind the film, the whole
assembly is placed in a dark bag. The film holder is popped out of the
aluminum plate with a push from the back. Slipping the tie wraps off the
outer edges of the cassettes loosens the film containers. Once the film is
advanced, the film holder is pushed back into the aluminum plate, the tie
wraps resecure the cassettes, and it's ready to go back into the camera in
less than a minute.
Keith Shank used an alternative approach. He made a roll film holder out of
1/16-inch aluminum plate. He drilled a matching hole in the plate that
allows a simple compression fit to the Schmidt film holder. The film spools
are held to the plate with plastic tie wraps. The aluminum plate is painted
black to prevent reflections inside the camera. To wind the film, the whole
assembly is placed in a dark bag. The film holder is popped out of the
aluminum plate with a push from the back. Slipping the tie wraps off the
outer edges of the cassettes loosens the film containers. Once the film is
advanced, the film holder is pushed back into the aluminum plate, the tie
wraps resecure the cassettes, and it's ready to go back into the camera in
less than a minute.
Gas Purging
In order to use hypered TP-2415 in the high humidity of south Texas, I had
to modify my Schmidt camera with a dry nitrogen purge system. The need for
this comes from the fact that water vapor will cause severe film fogging
with hypered TP-2415. Over the course of a long exposure, the film in its
holder is exposed to the large volume of open air inside the camera. During
this time, high humidity will substantially degrade the image contrast. High
humidity also degrades the Wratten gel filters used with the filter film
holder. Additionally, some unhypered films swell and creep as they absorb
water vapor. At the least, this creep will elongate star images at the edge
of the field of view. But since the film is firmly clamped in the Schmidt
film holder excessive creep will lead to film buckling that will cause focus
problems.
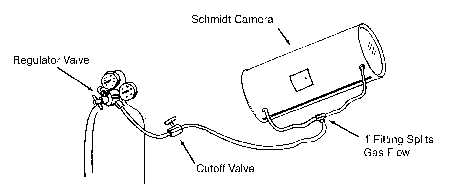 My solution to the humidity problem was to drill two small holes into the
Schmidt camera tube, one just above the mirror, and the other just below the
corrector plate. I installed Weatherhead brand 1/8-inch pipe brass fittings
through these holes and plumbed them with 1/4-inch rubber hose connected to
a nitrogen cylinder and pressure regulator. The nitrogen is regulated to
several pounds pressure and piped into the camera for about half a minute
after the film is loaded into the camera to flush out the humidity. If the
exposure is lengthy, the purge is repeated half way through the exposure.
There is no concern about pressurizing the interior of the camera, possibly
flexing or breaking the corrector plate, because the low-pressure nitrogen
bleeds out the loose-fitting film loading door. This humidity purging system
is the key to my being able to produce high-contrast long-exposure TP-2415
negatives with the Schmidt in spite of the image-busting local humidity.
My solution to the humidity problem was to drill two small holes into the
Schmidt camera tube, one just above the mirror, and the other just below the
corrector plate. I installed Weatherhead brand 1/8-inch pipe brass fittings
through these holes and plumbed them with 1/4-inch rubber hose connected to
a nitrogen cylinder and pressure regulator. The nitrogen is regulated to
several pounds pressure and piped into the camera for about half a minute
after the film is loaded into the camera to flush out the humidity. If the
exposure is lengthy, the purge is repeated half way through the exposure.
There is no concern about pressurizing the interior of the camera, possibly
flexing or breaking the corrector plate, because the low-pressure nitrogen
bleeds out the loose-fitting film loading door. This humidity purging system
is the key to my being able to produce high-contrast long-exposure TP-2415
negatives with the Schmidt in spite of the image-busting local humidity.
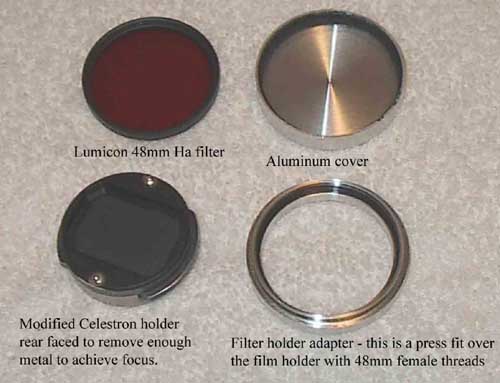
Using a Glass H-Alpha Filter
Richard Payne reports that he has good success using a glass Lumicon
Hydrogen-Alpha filter with his 5.5-inch F/1.65 Schmidt camera. He made a
metal adapter ring which slip fits over the film holder on one side while
the other side of the adapter has 48 mm female threads to accept a 48 mm
Lumicon filter. To achieve focus, Richard slowly machined the back of the
film holder over several days while taking Tech Pan exposures to verify the
focus during the machining process.
A Simple Shutter for a Schmidt Camera
Many folks have rigged mechanical shutters or devised caps that go over the
front of the corrector plate to act as a shutter for the Schmidt camera. One
of the simplest shutters is a plain black T-shirt. It is flopped over the
front of the camera before the film is loaded, then gently pulled off as the
exposure begins. A lighter weight black scarf will also work well, but may
be so light that it will blow off prematurely in a light breeze.
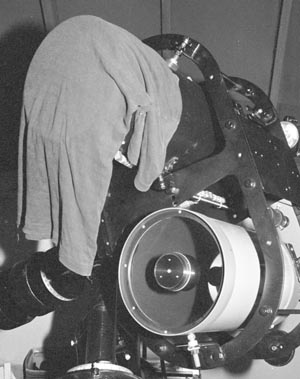
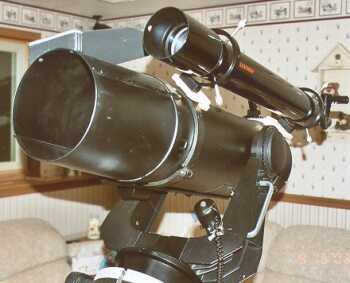
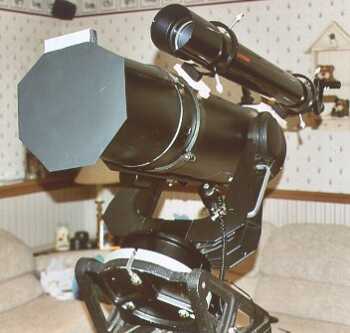
Dew Cap and Shutter Assembly
Chris Nisbit also sent me a note explaining how he created a combination dew
cap and shutter for both his 5.5-inch and 8-inch Schmidt cameras. He wrote:
"I live in Minnesota so dewing of the corrector is always a problem. After
seeing a picture of the Hubble Telescope, that gave me an idea for a dew
cap/shutter assembly. On the 5.5", a standard coffee can (painted flat black
of course) snugly fits over the end of the front cell and acts as the dew
cap. I then fastened a piece of flat black painted cardboard to the dew cap.
It is fastened in such a way that the cardboard shutter simply flips up when
the exposure starts and is flipped down when the exposure ends. The 8" uses
the same principle with the dew cap being the hard plastic Celestron Dew
Star dewcap. Both work great!!"
Notice the classy way Chris has mounted his Schmidt in a Celestron Ultima
fork mount with clamp rings holding the small Celestron refractor guide
scope. It looks good!
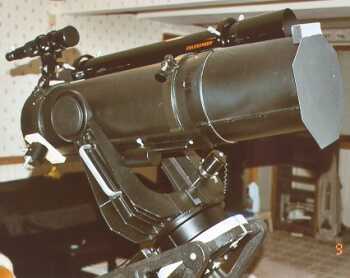
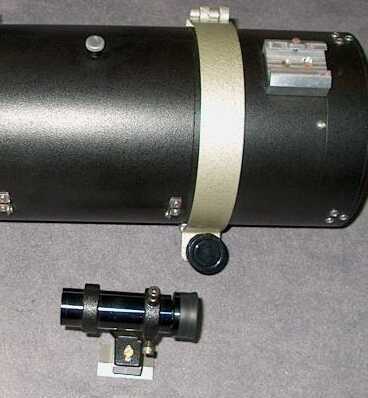
Installing a Bigger Finder
The standard 6 X 30 finder, often called the "soda straw finder", that comes
with the Schmidt camera is far from adequate to do anything other than align
setting circles. For ease of locating targets, I consider an 8 X 50 as the
minimum finder one should use, but other Schmidt users such as Kent Kirkley
use a Telerad with great success. The mounting bracket used with larger
aftermarket finders often will not fit the bolt pattern of the original
finder. Simply plug the original mounting holes with short machine screws
and drill new mounting holes for the larger finder a little farther up the
tube.
Drilling holes into the Schmidt's tube may seem intimidating at first, but
the finder will likely be mounted on the thin skin of the tube assembly
further up from the mirror. Here, a drill bit penetrating the tube will not
strike any internal components as long as it is located away from any of the
Invar rods along the inside of the tube. Locate the area inside the tube
where the drill will pop through the metal. On this location, use several
pieces of masking tape, sticky side toward the tube, to build up an enclosed
"tent" on the inside of the tube. This will capture drill shavings that fall
into the tube. After the holes are drilled, collapse the tape against the
tube wall so the shavings are stuck to the sticky side of the tape, and then
peel it off, taking the shavings with it. Use a 3/8-inch deep socket as a
drill stop so the drill bit will only penetrate a little way into the tube
without puncturing the tape "tent" on the inside of the hole.
Once the holes are drilled in the tube, the new finder can be attached with
machine screws and nuts. For installation, the nuts can be held through the
film-loading door. Spray a little flat back paint on a cotton Q-tip to paint
the nuts on the inside of the tube to reduce internal reflections.
 Aligning the finder with the Schmidt's field of view may be a challenge when
you consider that you can't actually see through the camera. But in a way,
you can see what the camera sees to adjust the aim of the finder. Draw a
crosshair on a piece of white paper and insert it into the film holder. Load
the film holder into the camera and aim the Schmidt at a bright target such
as the Moon or a bright planet. In twilight you can view the paper in the
film holder and see the target you are aimed at. Center the target on the
crosshairs drawn on the paper, then align the finder. If no Moon or planet
is visible, a first magnitude star is bright enough to be seen on the paper
in post-twilight darkness. Indirectly illuminate the film holder with a dim
red light in order to see the crosshair.
Aligning the finder with the Schmidt's field of view may be a challenge when
you consider that you can't actually see through the camera. But in a way,
you can see what the camera sees to adjust the aim of the finder. Draw a
crosshair on a piece of white paper and insert it into the film holder. Load
the film holder into the camera and aim the Schmidt at a bright target such
as the Moon or a bright planet. In twilight you can view the paper in the
film holder and see the target you are aimed at. Center the target on the
crosshairs drawn on the paper, then align the finder. If no Moon or planet
is visible, a first magnitude star is bright enough to be seen on the paper
in post-twilight darkness. Indirectly illuminate the film holder with a dim
red light in order to see the crosshair.
Homemade Removable Finder Bracket
Stefan Beck from Germany has made a homemade removable finder bracket that
allows the finder to be removed from his 5.5-inch Schmidt during transport,
but does not loose its alignment. His dovetail-type finder bracket is
fabricated from aluminum.
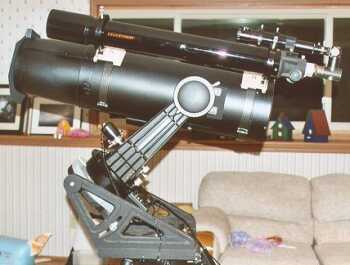
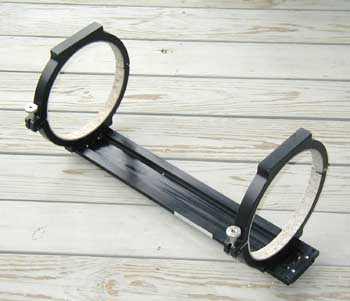
Mounting Rings Allow Rotating the Schmidt Camera
A good method for mounting a Schmidt on various popular German equatorial
mounts is to use Parallax brand rings sized to fit the diameter of the
Schmidt tube. These in turn are mounted on a Losmandy DC14 dovetail plate
originally made to fit the Celestron C-14. The rings are placed at the
extremes of the Schmidt tube, the bottom ring against the mirror cell, the
top ring against the corrector cell. This places the rings at the most rigid
part of the tube, preventing deformation of the Schmidt tube, which would
cause focus problems. It also keeps the Schmidt from moving up or down and
acts as a 'bearing surface' when the rings are loosened to allow rotating
the tube for composing images with the rectangular imaging surface of the
35mm holder or for easier access to the loading door.
It would be a good idea to contact Joe Nastassi of Parallax before ordering
rings for a Schmidt camera. He can put thicker felt in them to prevent
unwanted movement. Jim Bandy replaced the felt in his rings with cork, which
is very positive about holding the Schmidt still, but makes turning the tube
difficult unless the rings are almost opened.
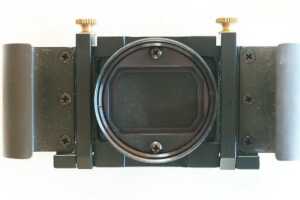
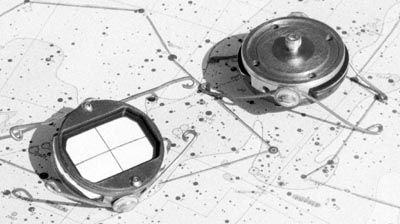
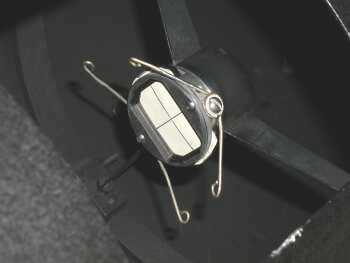
Interchangeable Tricolor Filters
John Mirtle has come up with an easy way to swap tri-color filters between
exposures. The factory-made filter holder is really designed to have a
single filter glued into place. Mirtle's system uses 2-inch superslide
holders for the filters, and a small aluminum jig that is siliconed onto the
original filter holder to hold the superslides. This is not a permanent
change because the silicone can be peeled off, restoring the filter holder
to its original state. The superslide holder is U-channels built from
aluminum scraps using silicone, JB Weld, a hacksaw and file. The basic idea
was to make no permanent change to the Schmidt (and therefore do no
permanent harm). The superslide-mounted filters simply slide in and out of
the channels. John has used this system for tri-color work, and for regular
Wratten #92 red filter work for two years.
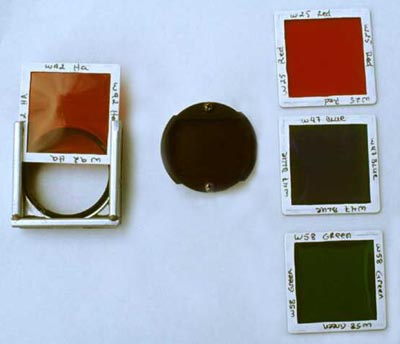 The filter holders were made from Gepe brand two mm thick superslide glass
slide mounts. The glass mounts were chosen because they are thicker and fit
the U-channel better, even though the glass is not used. The tricolor
filters are labeled on the superslide holder frame with black felt pen, as
you can't tell them apart with a red flashlight.
The U-channel forming the superslide holder started off as an aluminum
extrusion for a weatherstrip designed to be screwed to the bottom of a door.
The rubber weatherstrip skirt was removed and only the aluminum channel was
used. It was cut into three strips approximately 2-inches long and filed
down so that the slide mount made a snug fit in the U. They were then JB
Welded onto the 2.5" square piece of flat aluminum that had a hole for the
filter holder. It now only takes a few seconds to slide out one color, and
slide in another. The assembly does add a bit of diffraction, but less than
the roll film adapter.
The filter holders were made from Gepe brand two mm thick superslide glass
slide mounts. The glass mounts were chosen because they are thicker and fit
the U-channel better, even though the glass is not used. The tricolor
filters are labeled on the superslide holder frame with black felt pen, as
you can't tell them apart with a red flashlight.
The U-channel forming the superslide holder started off as an aluminum
extrusion for a weatherstrip designed to be screwed to the bottom of a door.
The rubber weatherstrip skirt was removed and only the aluminum channel was
used. It was cut into three strips approximately 2-inches long and filed
down so that the slide mount made a snug fit in the U. They were then JB
Welded onto the 2.5" square piece of flat aluminum that had a hole for the
filter holder. It now only takes a few seconds to slide out one color, and
slide in another. The assembly does add a bit of diffraction, but less than
the roll film adapter.
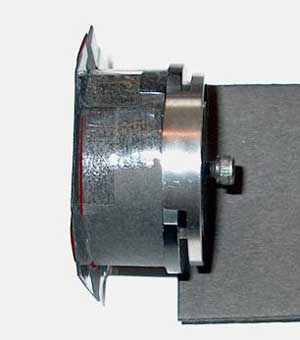
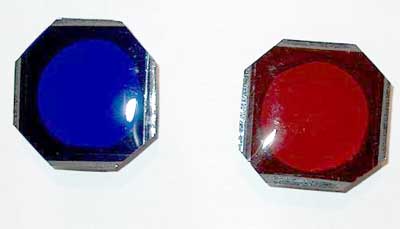
Homemade Wratten Filter Holders
Stefan Beck addapted Wratten filters to his 5.5-inch camera by fabricating
filter holders from heavy construction paper and tape. The red and blue
filters slip-fit onto the film holder with a push fit. Stefan notes that on
his camera the filters do not change the focus. The shorter focal length
5.5-inch camera is less sensitive to filter focus shift than its 8-inch
cousin.
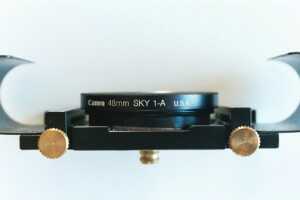
Another Homemade Wratten Filter Holder
Chris Nisbet also shares and idea on how to mount Wratten filters in the
Schmidt camera. He wrote:
"When I bought the 5.5-inch a few years back, it came with a filter film
holder and gel filters but no filter holder assembly. At a local camera
store, I scrounged around in their used filter bin for a 48mm metal filter
ring. Since I was only interested in the ring, the glass didn't matter. I
found a decent one, paid $5 for it and went to work making it fit on the
film holder assembly. Since the 48mm ring was just slightly larger than the
film holder, I simply put several pieces of electrical tape on the side of
the film holder until the ring fit snugly over the film holder. Now I had a
way to securely fasten filters to the film holder".
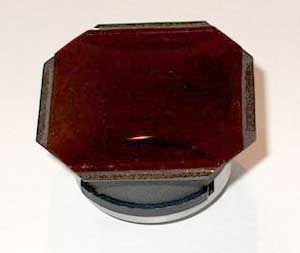
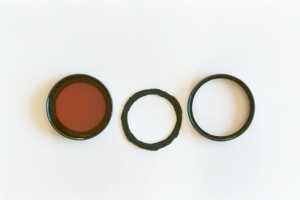
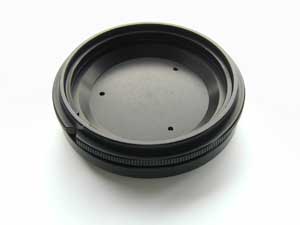
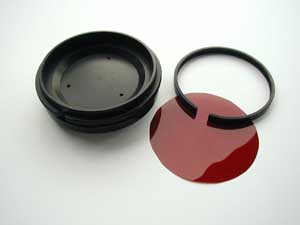
"Gel filters, as you know, do not come mounted in a filter ring. I went back
to the camera store and bought a supply of the $5 used filters. What is
critical in buying these rings is the way the glass is mounted in the ring.
I needed the type that the glass is secured in with a retaining ring, NOT a
snap ring. The next task was to mount the gel filter in the 48mm filter
ring. The basic principle that I came up with is to have the gel material
in-between a "sandwich" of two thin rings that will fit in place of the
original glass. To start with, I removed the glass from the filter ring and
made a tracing of it on a THIN sheet of wood I picked up at a craft store.
This will serve as the outer dimension for the ring that will fit into the
filter ring. I then used a prescription bottle to trace the inside circle
for the gel filter (the inner dimension). Using a new razor blade, I cut out
the wood ring. (If it doesn't quite fit, use sandpaper to trim it down). The
rings were then painted flat black. To assemble, put one ring in the bottom,
put in the gel material, put in the top ring and secure it with the original
retaining ring. You now have a mounted 48mm gel filter that will screw into
the filter ring that is on the film holder. And, you can get a 48mm camera
lens cap that can be fastened onto the gel filter assembly when the exposure
is finished. The picture of the gel filter holder I sent is slightly
different than the description above. I found out that not all camera
filters have the same depth. The "sandwich" was thick enough that while I
could get the retaining ring on, I couldn't get the 48mm lens cap on. Not
enough thread showing. Back to the camera store for another $5 filter. I
removed the glass from this one and the filter ring became the retaining
ring for the "sandwich". Now I had plenty of thread for the lens cap to
grab."
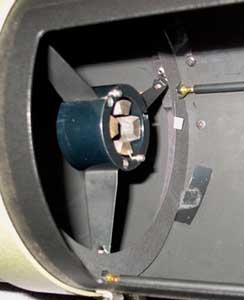
Controlling Vignetting With an Internal Aperture Stop
Another Schmidt modification by German astrophotographer Stefan Beck is the
addition of an internal aperture stop to control vignetting. Instead of
placing the stop on the corrector plate on the outside of the camera as is
often done, Stefan permanently mounted a 120 mm aperture stop inside the
camera at the focus of the mirror. He performed this modification on the
advice of Austrian astronomer Gerald Rhemann, who in turn relied on tests
made by fellow Austrian Michael Jaeger. The paper aperture is attached to
the lower side of the spider cage around the inside of the tube.
Sealed Film Holder
Michael Treacy has designed a sealed and desiccated film holder for his
Schmidt. Two decades ago, the precedent for this was set by the Rosemary
Hill Observatory in Florida as a way to combat the ill effects of humidity
on photographic plates exposed to the open air inside the telescope tube.
Michael has designed the device on a CAD system and will soon start
construction using a computer-controlled milling machine.
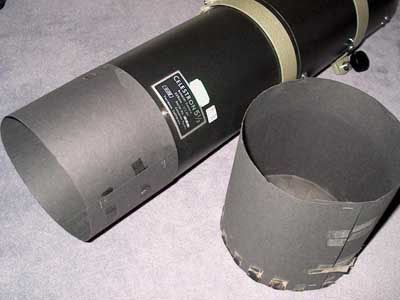
Homemade Dew Cap and Shutter Assembly
The 5.5-inch Schmidt camera is small enough that an effective dew cap and an
aperture cover (aka: a "shutter assembly") can be fabricated from back
construction paper, staples, and tape like in this example from Stefan Beck.
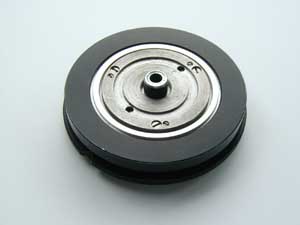
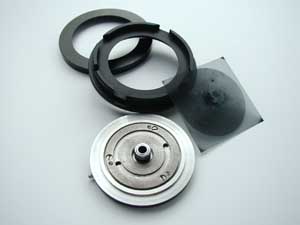
Focusing a Vehrenberg 10-degree Film Holder
Kent Kirkley notes that once his camera was focused by Epoch Instruments for
the 35 mm film holder, he only uses the push-pull screws on the back of his
Vehrenberg wide-field film holder to adjust its focus. He notes that the
Vehrenberg changes focus slightly from cold weather to hot weather. He also
states that the three sets of push-pull screws on the back of the Vehrenberg
can address the tilt issue with the holder, but it is also a problem when
attempting to make 'straight-line' focus movement without introducing any
tilt.
 Kent has also noticed another problem with the Vehrenberg holder. With
120-format roll film, the star images are focused evenly all over the plate.
But with thicker 7 mil 4 x 5 sheet film, the center of the plate has
slightly enlarged images. This is, no doubt, is because the thicker base of
the sheet film does not bend as easily or evenly as the thinner 120 films.
However, the 120 roll film suffers from curling and is difficult to handle.
For this reason, Kent continues to use the sheet film.
Kent has also noticed another problem with the Vehrenberg holder. With
120-format roll film, the star images are focused evenly all over the plate.
But with thicker 7 mil 4 x 5 sheet film, the center of the plate has
slightly enlarged images. This is, no doubt, is because the thicker base of
the sheet film does not bend as easily or evenly as the thinner 120 films.
However, the 120 roll film suffers from curling and is difficult to handle.
For this reason, Kent continues to use the sheet film.
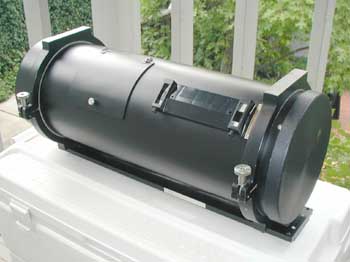
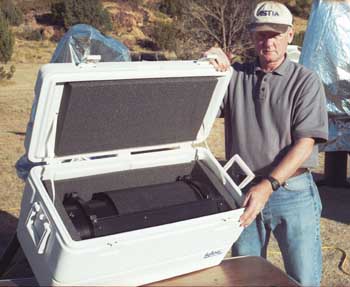
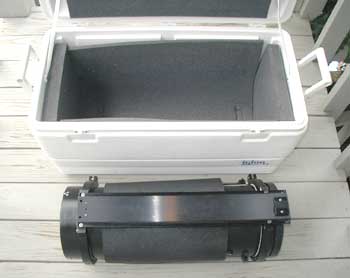
Schmidt Camera Carrying Case
Kirkley also has an unusual recommendation for a carrying case for the
Schmidt camera. If you have a large ice chest just over two feet wide, it
makes a perfect transporter for the 8-inch Schmidt. For the 8-inch Schmidt,
an Igloo brand 90-quart cooler works perfectly. Currently, this size cooler
retails for $49.95 at at the Academy Sports retail chain. For a telescope
carrying case, this is a real bardgain! A sheet of 2-inch thick foam rubber
is inserted into the ice chest to cradle the Schmidt. Ice chests naturally
resist heat, seal out dust fairly well, their insulation acts as shock
padding for the optics, and the built-in handles make carrying the Schmidt
an easy task.
I had previously mentioned that if you had a large ice chest that leaked,
and otherwise could not be used, it might make a good Schmidt case. I now
reverse myself on that after realizing that if the cooler had been leaking,
it is very likely that the insulation between the cooler's walls is water
soaked. At the least, this water might seep back into the case with the
Schmidt, at worst it might start a nasty case of mold on the Schmidt. So, I
now suggest that you do what we have always done, toss out the leaky cooler
and buy a dedicated cooler only for the Schmidt.
Go to the previous page ---- Removing the Mirror
Go to the next page -------- Common Schmidt Camera
Errors