Checking Mirror Collimation

The mirror collimation process begins by using an accurate ruler to find the
center of the corrector plate to within 1/32 inch. Try out a black felt tip
pen on a windowpane to make sure you can wipe it off glass with a damp
cloth, and then use it to put a little dot in the center of the corrector
plate. This is easier to do if you place a piece of white paper on top of
the spider assembly so you can see what you are doing on the corrector
plate.
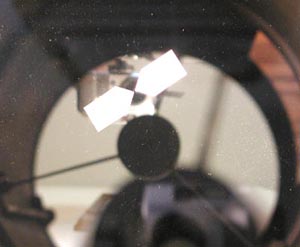
Once the black dot marks the center of the corrector, lay a 1/2-inch wide
paper arrow (basically shaped like a cutout of a house, like a square with a
triangle attached to form the "roof") on the corrector so the point is right
on the black dot.
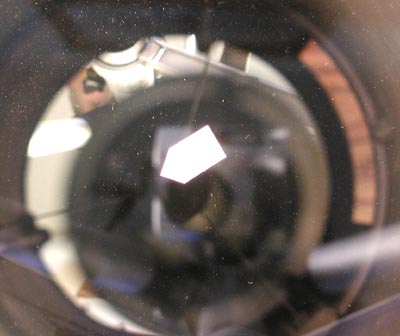
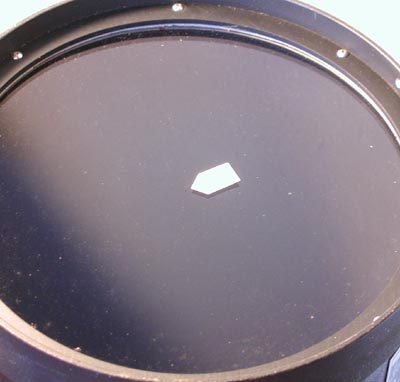 Shine a light down the tube and you will see an inverted reflection of the
arrow opposite the center of the corrector. If the mirror is collimated, the
tip of the reflected arrow will also line up with the black dot. (LEFT) If
the mirror is not collimated, the two arrow tips will never line up
together. (RIGHT)
If you look exactly down the optical axis the reflection will disappear, as
the film holder magnet will hide it. You have to look slightly off axis down
the tube so the tip of the arrow is just out of eclipse with the film holder
magnet.
Shine a light down the tube and you will see an inverted reflection of the
arrow opposite the center of the corrector. If the mirror is collimated, the
tip of the reflected arrow will also line up with the black dot. (LEFT) If
the mirror is not collimated, the two arrow tips will never line up
together. (RIGHT)
If you look exactly down the optical axis the reflection will disappear, as
the film holder magnet will hide it. You have to look slightly off axis down
the tube so the tip of the arrow is just out of eclipse with the film holder
magnet.
 Look on one side, then the opposite, then rotate 90 degrees around the tube
and look from both sides again. Keep nudging the paper arrow until it lines
up the best from all four viewing angles. On one side of the tube, it may
look slightly displaced in one direction, and then slightly displaced the
other direction from the other side of the tube. This shift is caused by
changes in perspective of the viewing angle. Nudging the paper arrow into
adjustment with the tip of your finger may be too clumsy for the minute
steps required. It may be more convenient to move the arrow by using the
point of a needle.
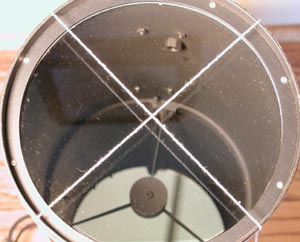
An alternative, but less accurate, method for checking mirror collimation is
to stretch two white threads across the front of the corrector so they make
a crosshair pattern centered on the middle of the corrector.
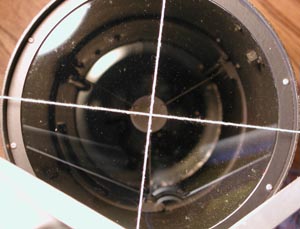
Shine a light down the tube and view the reflections of the threads on the
bottom of the corrector. The reflection and the threads should coincide with
the reflection hidden completely behind the threads. At the same time, as
viewed from the center axis of the optical tube, the center of the
crosshairs should be centered on the middle of the film holder.
The crosshair method of collimation testing is not as accurate as the paper
arrow trick discussed above, but may be easier to apply in the field for a
quick collimation check while the camera is installed in its mount.
Look on one side, then the opposite, then rotate 90 degrees around the tube
and look from both sides again. Keep nudging the paper arrow until it lines
up the best from all four viewing angles. On one side of the tube, it may
look slightly displaced in one direction, and then slightly displaced the
other direction from the other side of the tube. This shift is caused by
changes in perspective of the viewing angle. Nudging the paper arrow into
adjustment with the tip of your finger may be too clumsy for the minute
steps required. It may be more convenient to move the arrow by using the
point of a needle.
An alternative, but less accurate, method for checking mirror collimation is
to stretch two white threads across the front of the corrector so they make
a crosshair pattern centered on the middle of the corrector.
Shine a light down the tube and view the reflections of the threads on the
bottom of the corrector. The reflection and the threads should coincide with
the reflection hidden completely behind the threads. At the same time, as
viewed from the center axis of the optical tube, the center of the
crosshairs should be centered on the middle of the film holder.
The crosshair method of collimation testing is not as accurate as the paper
arrow trick discussed above, but may be easier to apply in the field for a
quick collimation check while the camera is installed in its mount.
Go to the previous page ---- Removing
the Corrector Plate
Go to the next page -------- Adjusting
Mirror Collimation